지인들과 사이드 프로젝트로 MBTI 유형별 위로 메시지를 제공하는 위로앱을 만들고 배포했다.
이번 프로젝트를 진행하면서 푸시 알림 관련 기능을 처음으로 건드려봤다. FCM(Firebase Cloud Messaging)을 이용했는데, 이 과정이 꽤 까다로웠다.
*Firebase 프로젝트 생성, Firebase에 bundle identifier 등록, Firebase SDK 추가 등 기본적인 앱-Firebase 간의 연결은 마쳤다고 가정하고 진행해보겠다. Firebase 가이드 문서를 따라하면 어렵지 않게 할 수 있다.
0. FCM
기본적으로 FCM의 구조는 아래와 같다. Firebase에 요청을 하면 Firebase가 Backend 역할을 수행해 디바이스에 푸시 알림을 보내주는 구조이다. 보기에는 간단해 보이는데 그렇지만은 않았다.
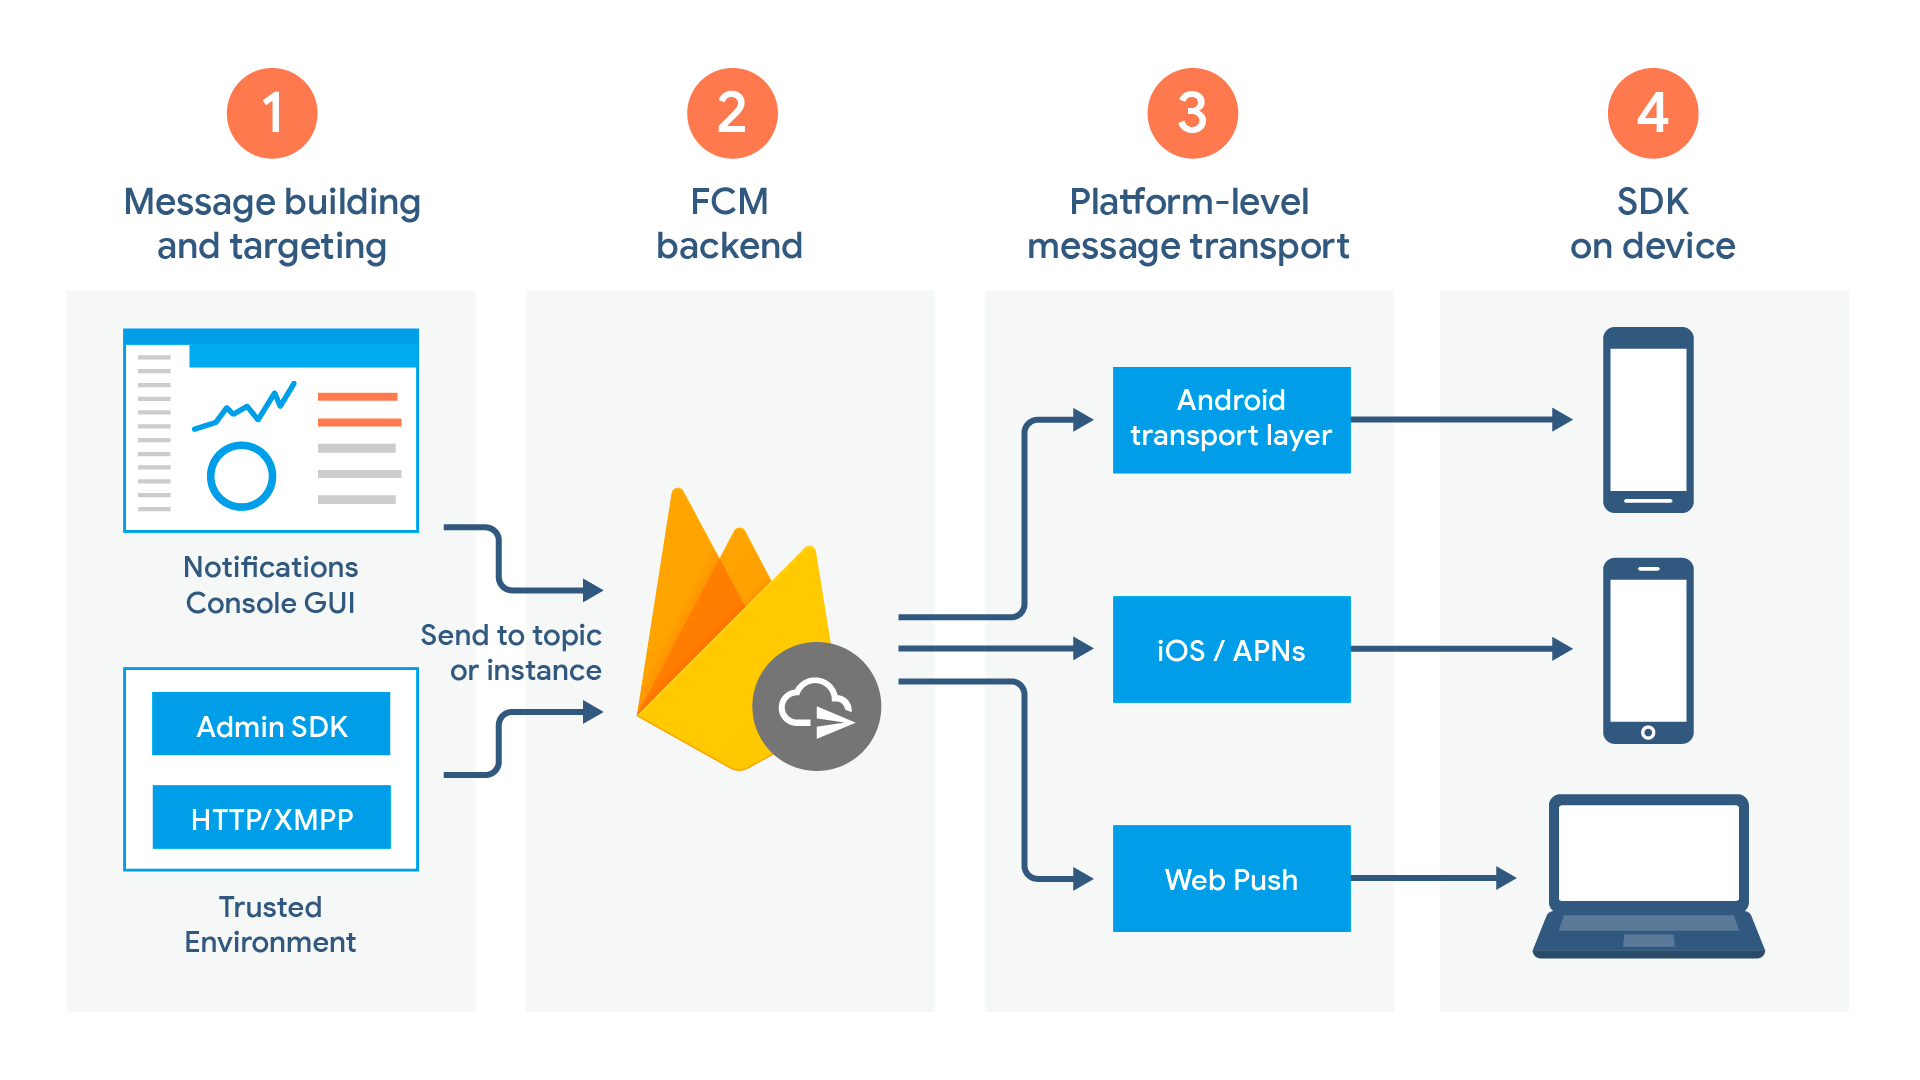
위 사진처럼 간단하게(?) 푸쉬알림 기능을 구현하기 위해 Firebase 공식문서를 그대로 따라갔다. 공식문서가 잘 작성되어있지만 실질적으로 부딪혔던 설명이 빠진 부분(예를 들면 인증 키 발급 같은)을 추가했다.
1. APNs 인증 키 발급
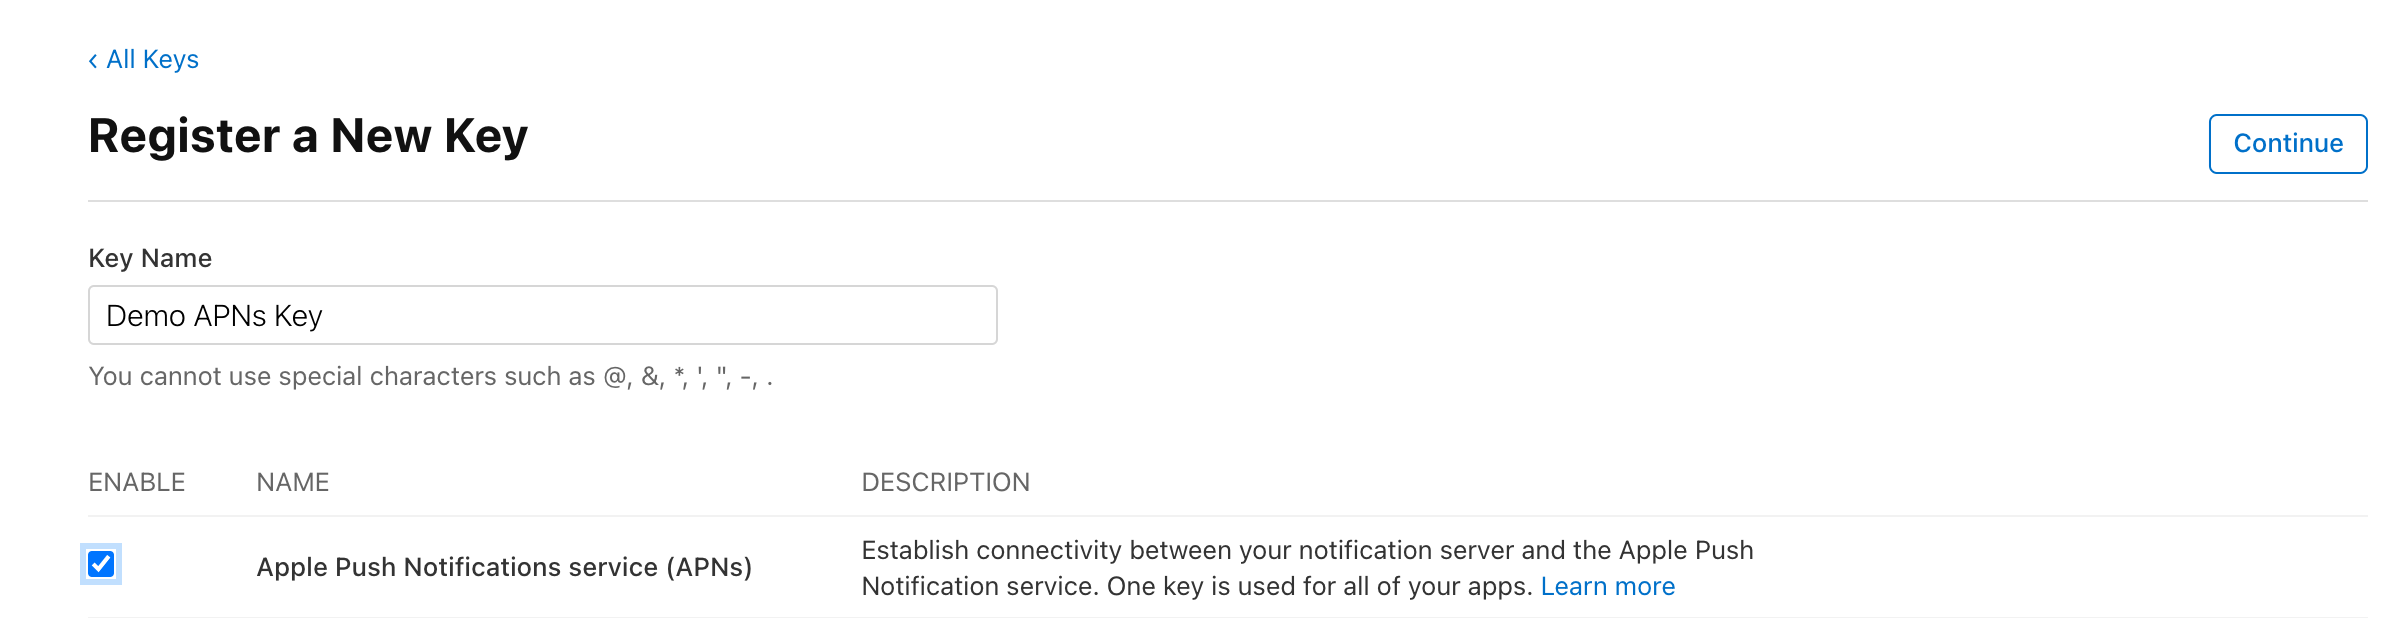
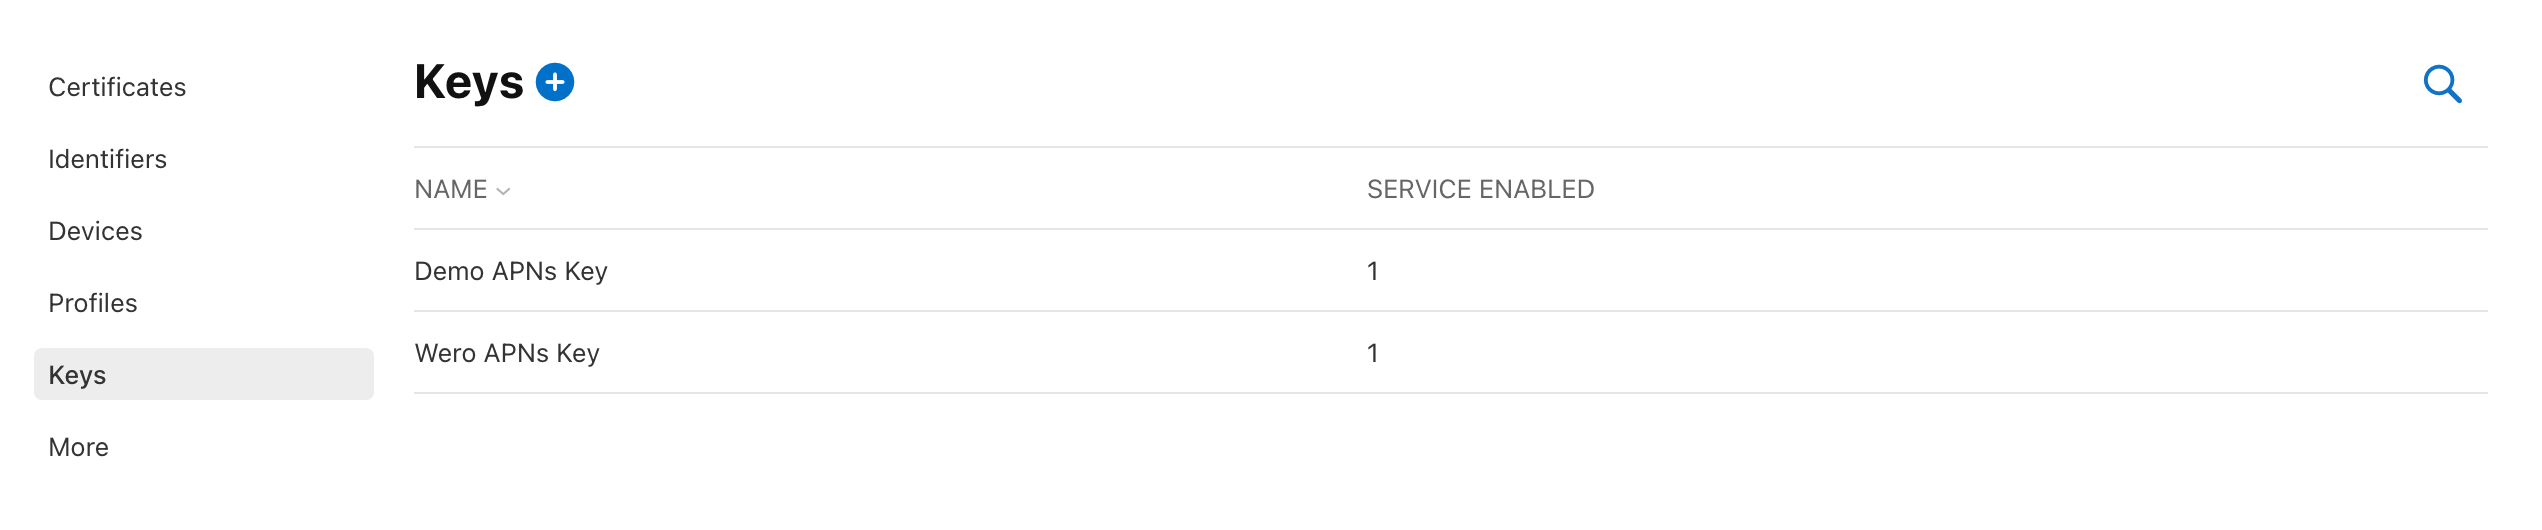
Apple Developer > Certificates, Identifiers & Profiles > Keys > +버튼

위 과정을 거치면 Register a New Key 페이지에 도달한다. 여기서 원하는 Key Name을 쓰면 된다. 주의할 점은 반드시 Apple Push Notifications service (APNs)를 선택하고 continue 해야 한다는 것!
그렇게 key register를 마치면 키가 생성되고, 생성된 key를 download 할 수 있다. Firebase project setting에 업로드해야하니 다운로드해놓자.
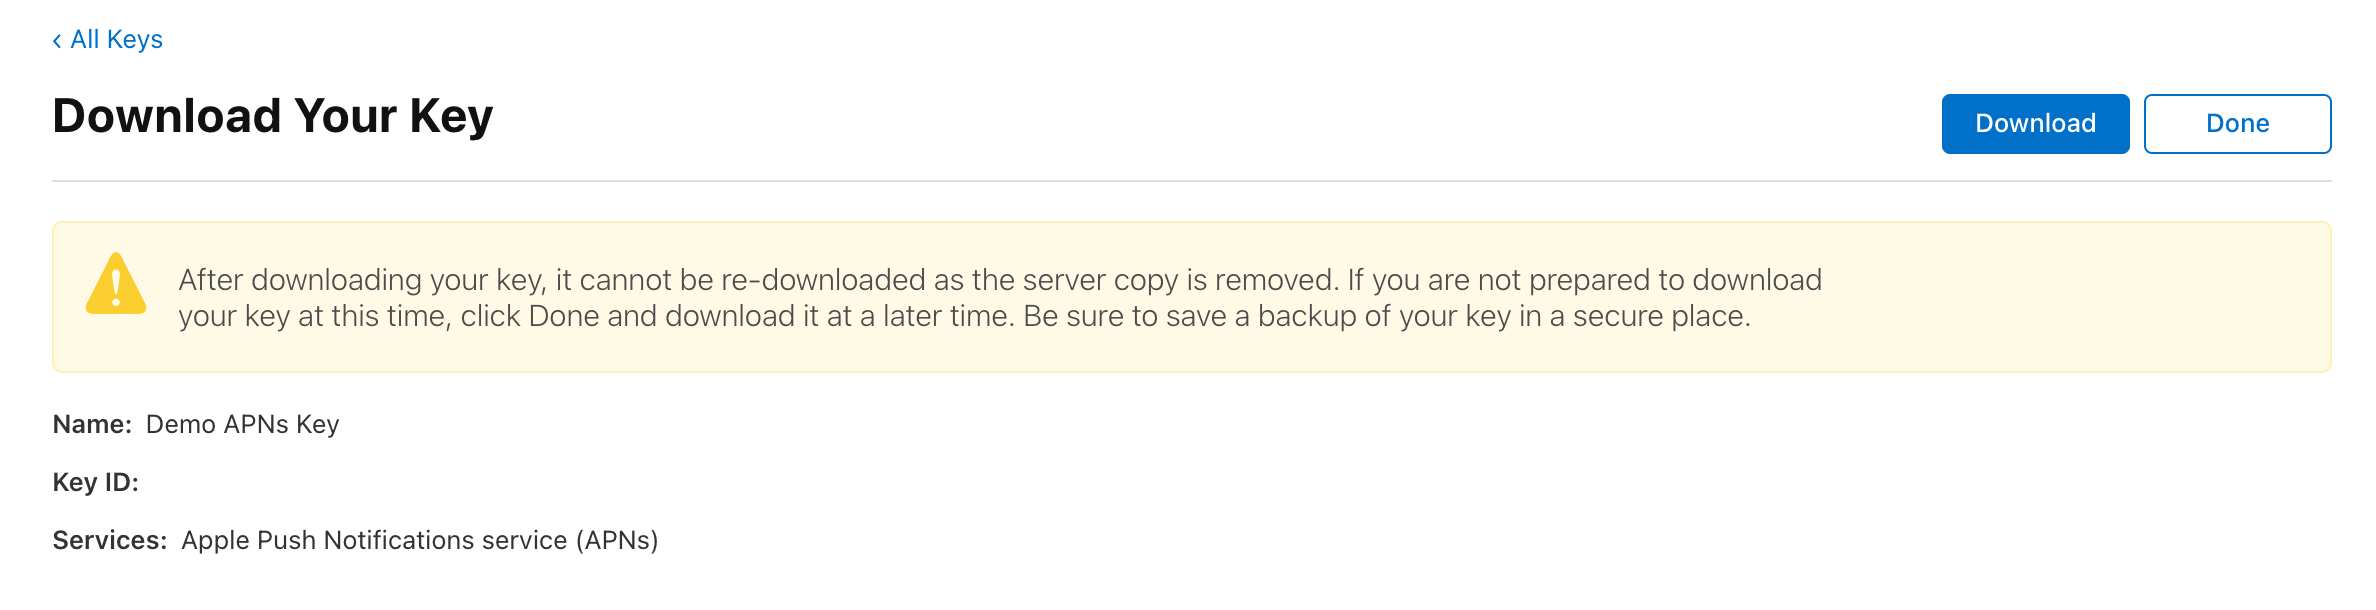
Done을 누르면 이제 Keys에 방금 만든 Demo APNs Key가 생성된 것을 볼 수 있다. 그리고 컴퓨터에는 방금 다운로드한 AuthKey.p8 파일이 있어야 한다.
2. APNs 인증 키 업로드
이제 Firebase에 APNs 인증 키를 업로드하자.
Project Overview > 톱니바퀴 > Project settings > Cloud Messaging
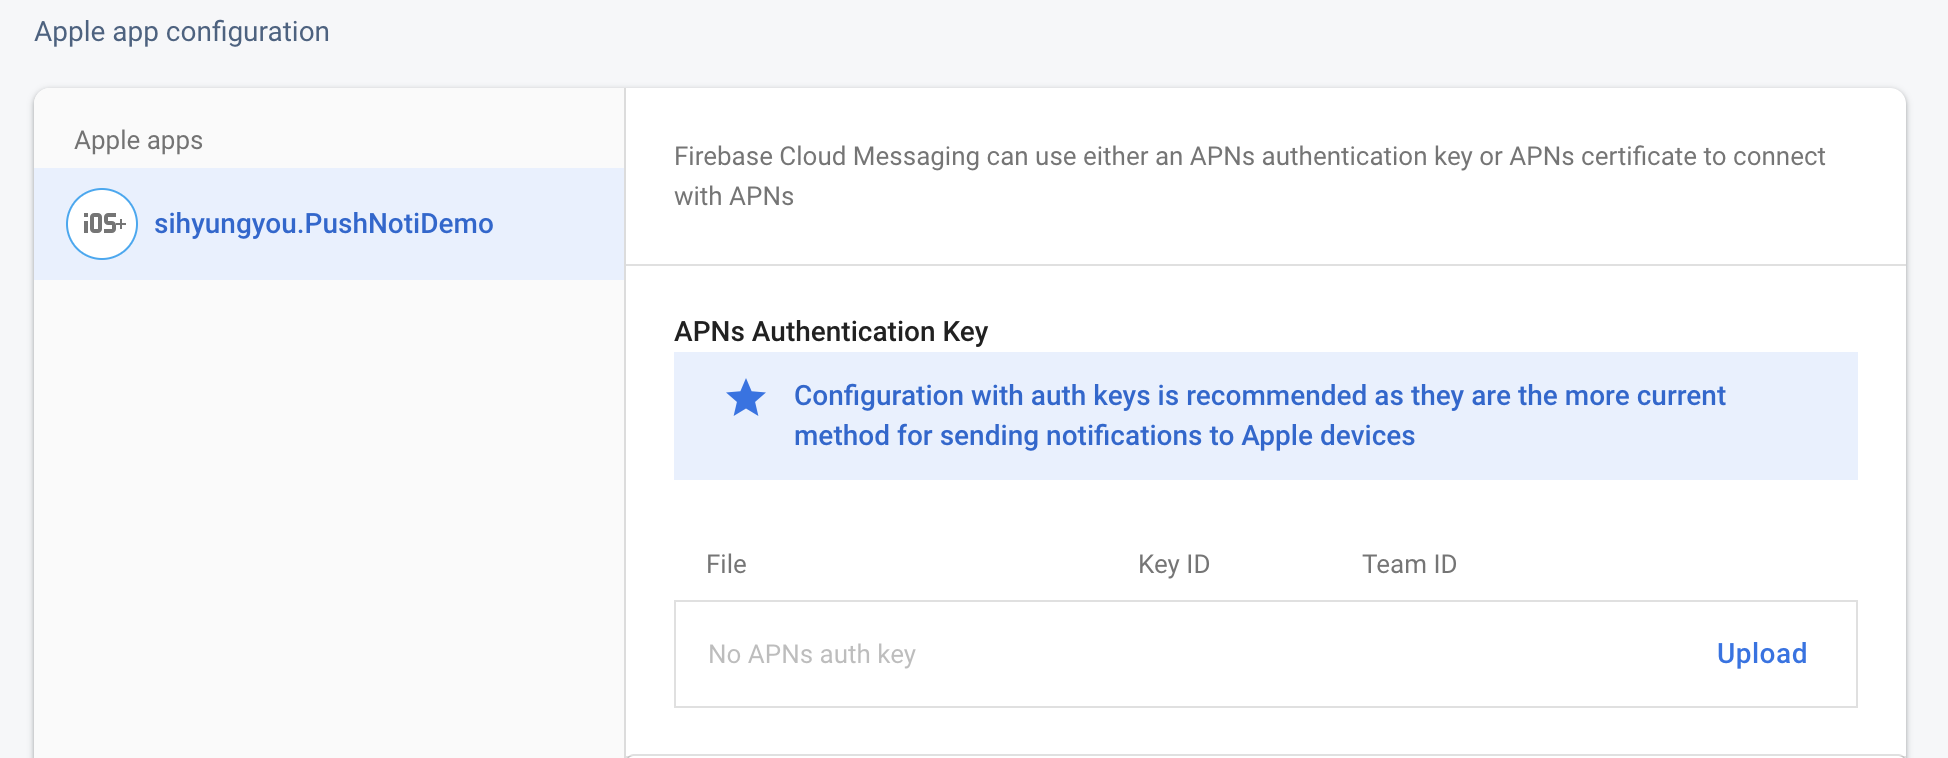
Cloud Messaging 탭에 오면 Apple app configuration이 있다. 여기에 APNs Authentication Key를 업로드하는 란이 있는데, 방금 다운로드해놓은 .p8 파일을 업로드하면 된다.
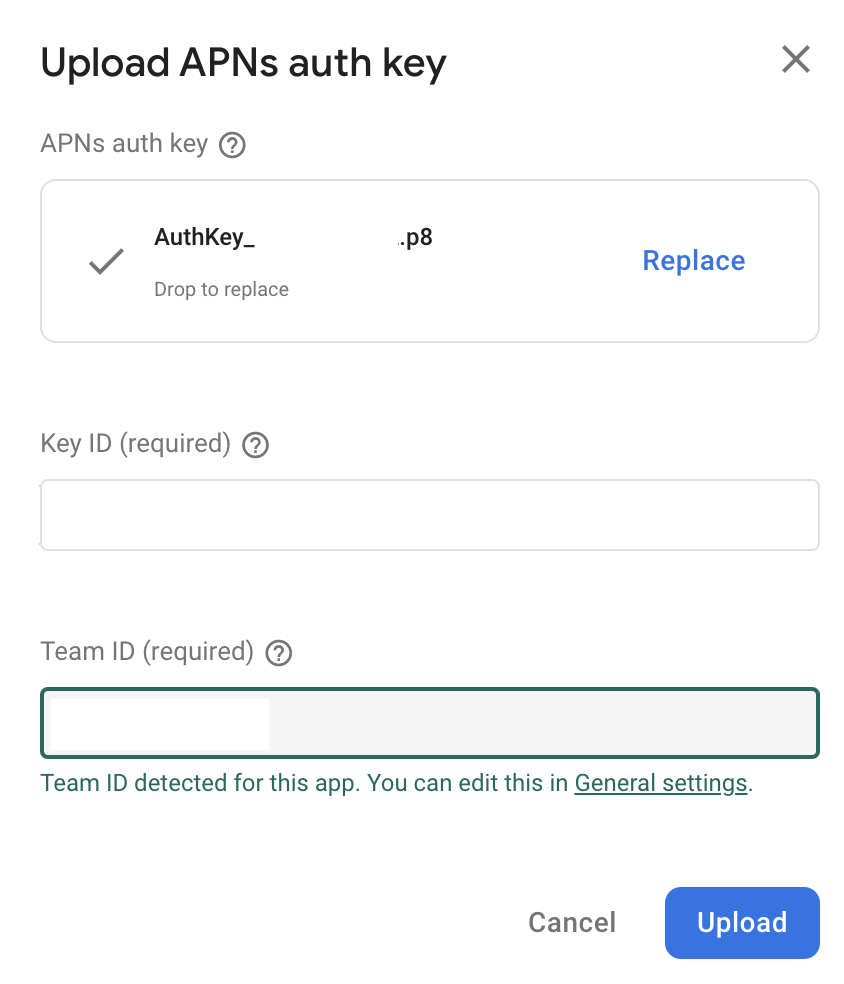
여기서 Key ID와 Team ID를 기입해야 하는데,
Key ID는 Apple Developer > Certificates, Identifiers & Profiles > Keys에서 키를 선택하면 해당 키의 정보를 보여주는 페이지에서 찾을 수 있다.
Team ID는 Apple Developer > Membership 탭으로 들어가면 확인할 수 있다.
3. 원격 알림 등록
이제 Firebase에 등록할 것은 마쳤다. Xcode로 돌아가 보자. 애플리케이션이 시작될 때, 원격 알림에 앱을 등록해야 한다. 아래 코드를 AppDelegate > didFinishLaunchingWithOptions 메소드에 추가한다.
if #available(iOS 10.0, *) {
  // For iOS 10 display notification (sent via APNS)
  UNUserNotificationCenter.current().delegate = self

  let authOptions: UNAuthorizationOptions = [.alert, .badge, .sound]
  UNUserNotificationCenter.current().requestAuthorization(
    options: authOptions,
    completionHandler: { _, _ in }
  )
} else {
  let settings: UIUserNotificationSettings =
    UIUserNotificationSettings(types: [.alert, .badge, .sound], categories: nil)
  application.registerUserNotificationSettings(settings)
}

application.registerForRemoteNotifications()
(위로 프로젝트의 경우 최소 지원 버전이 iOS 13이어서 iOS 10.0을 대응하는 분기는 제거했다)
이렇게만 작성하면 UNUserNotificationCenterDelegate를 채택하지 않았다는 에러가 뜰 텐데, AppDelegate가 해당 프로토콜을 채택하도록 해주자.
4. 등록 토큰 엑세스
FCM SDK는 앱을 시작할 때 클라이언트 앱 인스턴스용 등록 토큰을 생성한다. 이 토큰을 사용해서 타겟팅된 알림을 앱의 모든 특정 인스턴스로 전송이 가능하다.
앱 시작 시 FCM은 FIRMessagingDelegate의 messaging:didReceiveRegistrationToken: 메서드를 통해 등록 토큰을 제공한다. 이 토큰은 아래 세 경우에 대해 변경될 수 있다.
- 새 기기에서 앱 복원
- 사용자가 앱 삭제/재설치
- 사용자가 앱 데이터 삭제
AppDelegate > didFinishLaunchingWithOptions 메소드에 아래 코드를 추가하자.
Messaging.messaging().delegate = self
이 코드를 추가하면 MessagingDelegate를 채택하지 않았다는 에러가 뜬다. 위에서처럼 역시 AppDelegate가 해당 프로토콜을 채택하도록 추가하자.
이제 현재 디바이스의 등록 토큰을 가져올 수 있다. 위에서 설명했듯, 이 토큰은 messaging:didReceiveRegistrationToken: 메소드를 통해 전달받을 수 있다.
func messaging(_ messaging: Messaging, didReceiveRegistrationToken fcmToken: String?) {
	print("fcmToken: \\(fcmToken)")
}
APN 토큰과 등록 토큰을 매핑시키는 아래 코드도 추가해주자.
func application(application: UIApplication,
                 didRegisterForRemoteNotificationsWithDeviceToken deviceToken: Data) {
  Messaging.messaging().apnsToken = deviceToken
}
아래는 지금까지 진행된 AppDelegate 전체 코드다
import UIKit
import Firebase

@main
class AppDelegate: UIResponder, UIApplicationDelegate {

    func application(_ application: UIApplication, didFinishLaunchingWithOptions launchOptions: [UIApplication.LaunchOptionsKey: Any]?) -> Bool {
        // Override point for customization after application launch.
        FirebaseApp.configure()

        if #available(iOS 10.0, *) {
          // For iOS 10 display notification (sent via APNS)
          UNUserNotificationCenter.current().delegate = self

          let authOptions: UNAuthorizationOptions = [.alert, .badge, .sound]
          UNUserNotificationCenter.current().requestAuthorization(
            options: authOptions,
            completionHandler: { _, _ in }
          )
        } else {
          let settings: UIUserNotificationSettings =
            UIUserNotificationSettings(types: [.alert, .badge, .sound], categories: nil)
          application.registerUserNotificationSettings(settings)
        }

        application.registerForRemoteNotifications()
        Messaging.messaging().delegate = self

        return true
    }

    // MARK: UISceneSession Lifecycle

    func application(_ application: UIApplication, configurationForConnecting connectingSceneSession: UISceneSession, options: UIScene.ConnectionOptions) -> UISceneConfiguration {
        // Called when a new scene session is being created.
        // Use this method to select a configuration to create the new scene with.
        return UISceneConfiguration(name: "Default Configuration", sessionRole: connectingSceneSession.role)
    }

    func application(_ application: UIApplication, didDiscardSceneSessions sceneSessions: Set<UISceneSession>) {
        // Called when the user discards a scene session.
        // If any sessions were discarded while the application was not running, this will be called shortly after application:didFinishLaunchingWithOptions.
        // Use this method to release any resources that were specific to the discarded scenes, as they will not return.
    }


}

extension AppDelegate: UNUserNotificationCenterDelegate {

    func application(application: UIApplication, didRegisterForRemoteNotificationsWithDeviceToken deviceToken: Data) {
      Messaging.messaging().apnsToken = deviceToken
    }

}

extension AppDelegate: MessagingDelegate {

    func messaging(_ messaging: Messaging, didReceiveRegistrationToken fcmToken: String?) {
        print("fcmToken: \(fcmToken)")
    }

}
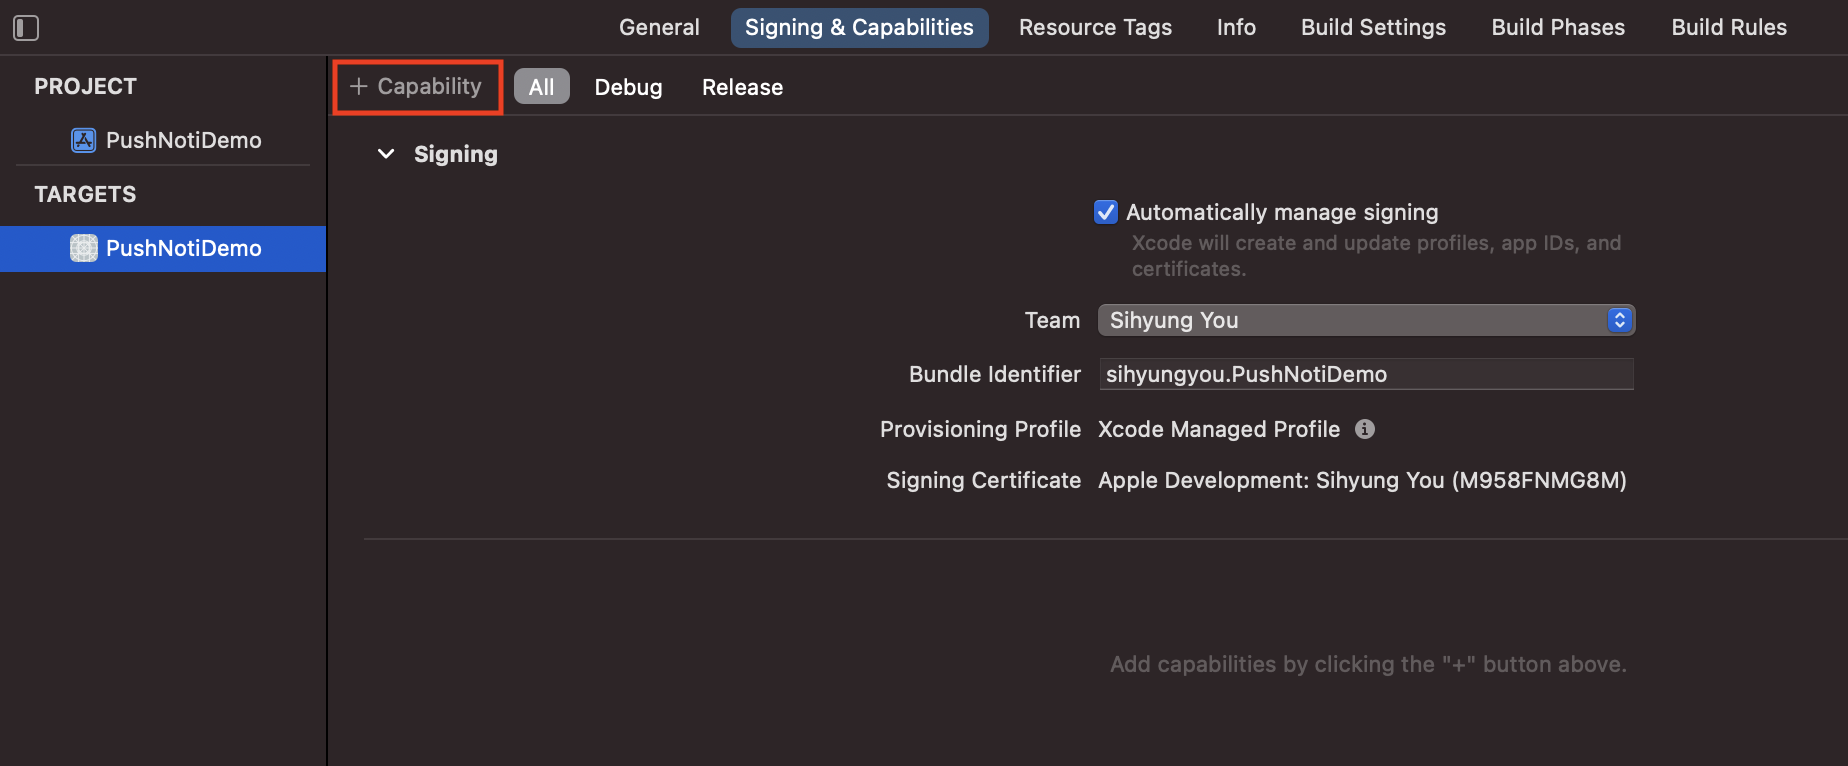
5. Capabilities 추가
앱 타겟으로 가서 Push Notification을 추가해주자. 아래 사진처럼 진행하면 된다.
6. Firebase Cloud Messaging 콘솔에서 테스트
didReceiveRegistrationToken 메소드에서 fcmToken을 print로 찍어둔 이유가 있다. Firebase Cloud Messaging 콘솔 테스트 시 fcmToken이 필요하기 때문이다.
Firebase > Cloud Messaging 탭으로 가보자.
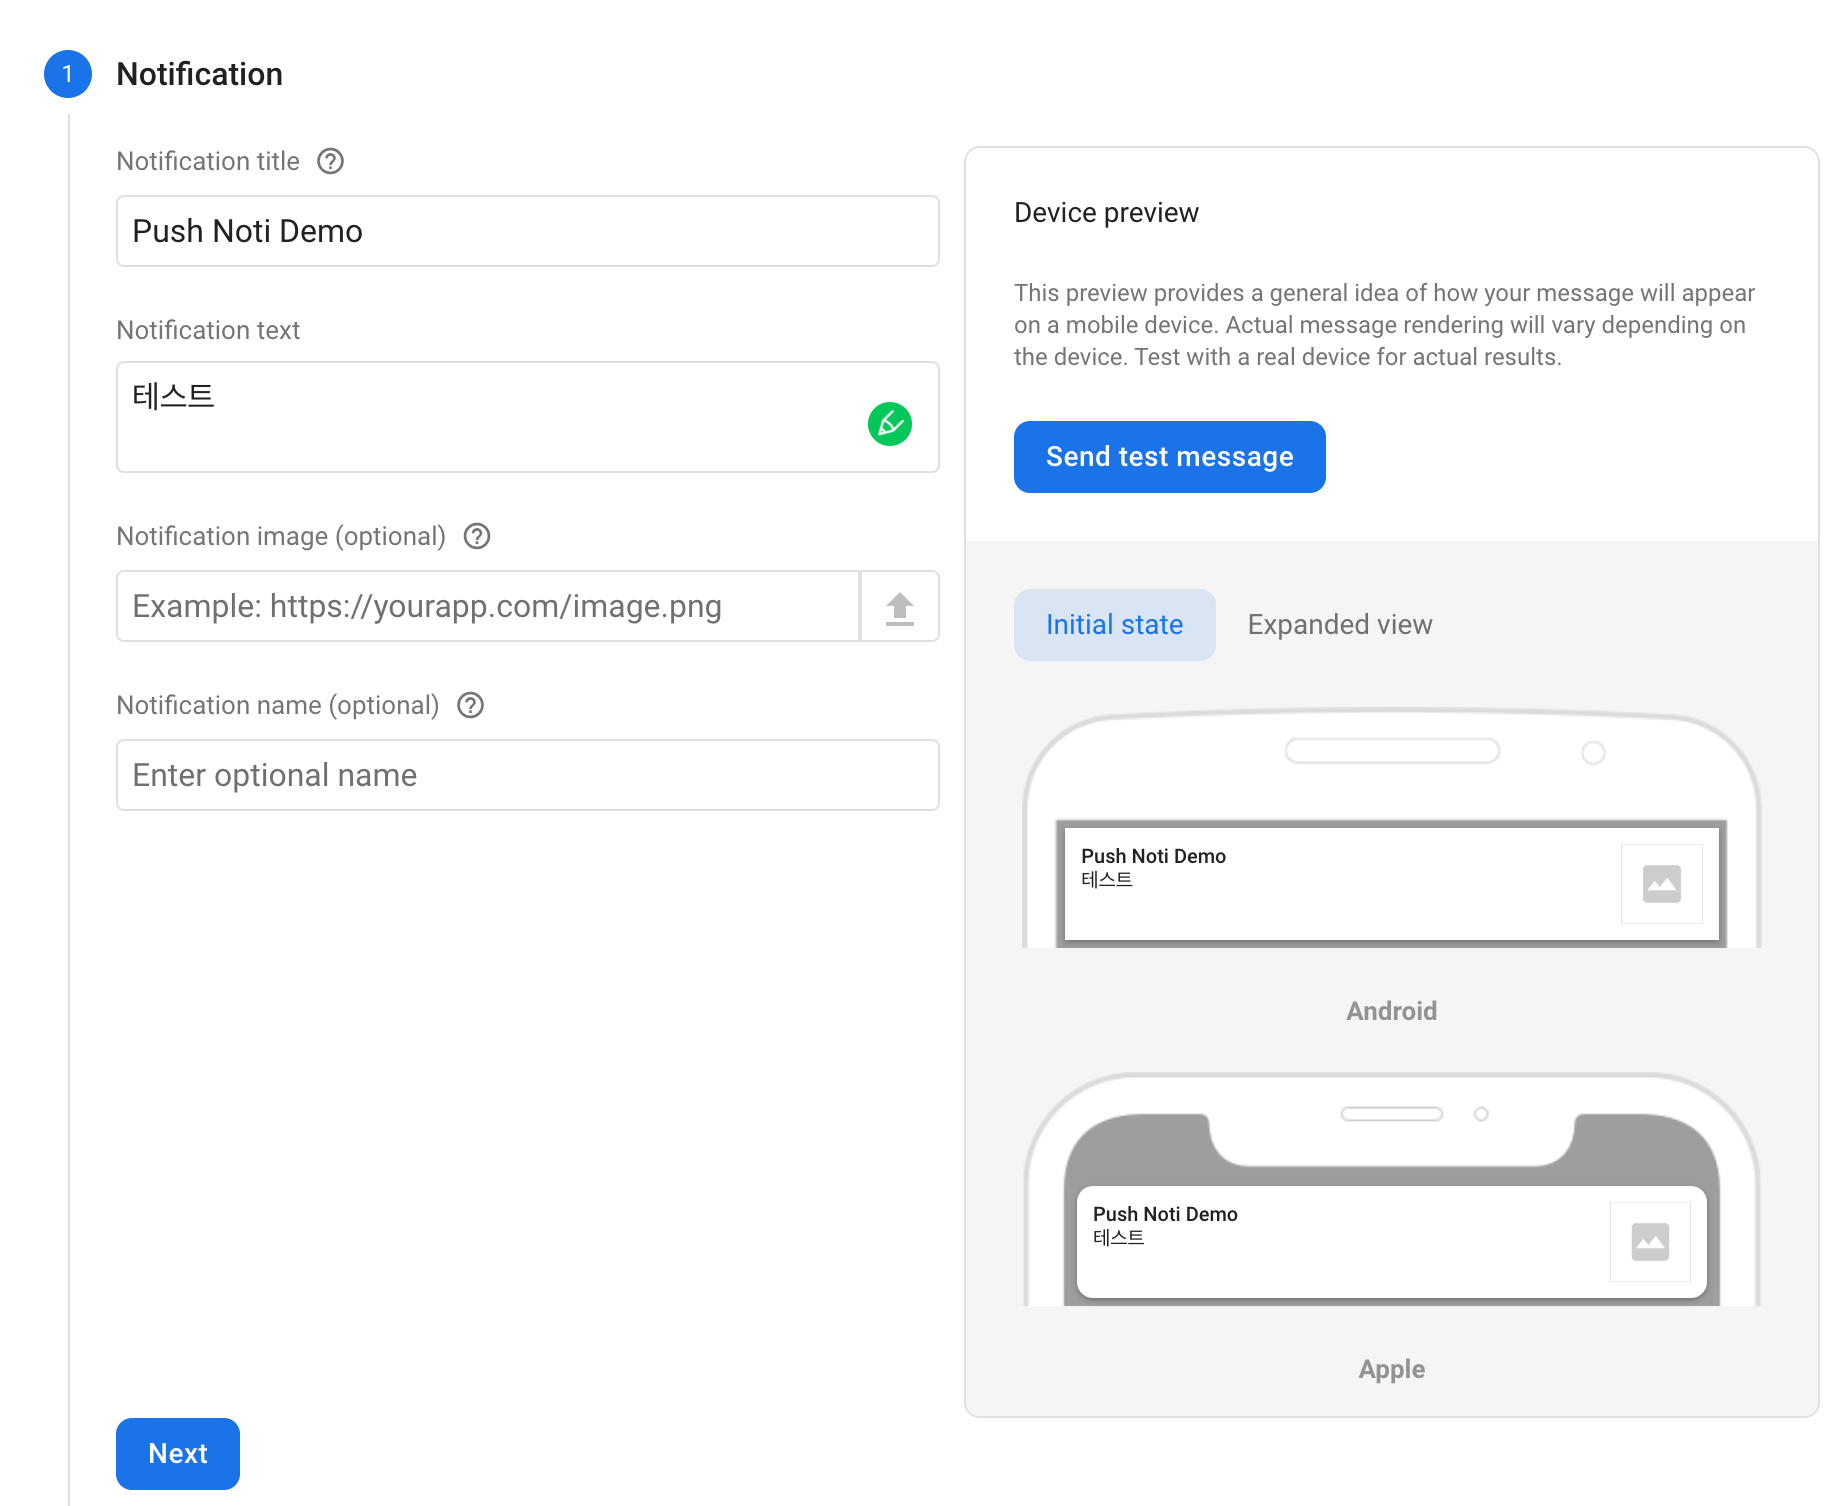
위 사진에서 우측에 Send test message 버튼을 누르면 fcmToken을 추가할 수 있다. Xcode 콘솔에서 복사해온 후, Next 누르며 쭉 진행해주면 푸시 알림을 보낼 수 있다.
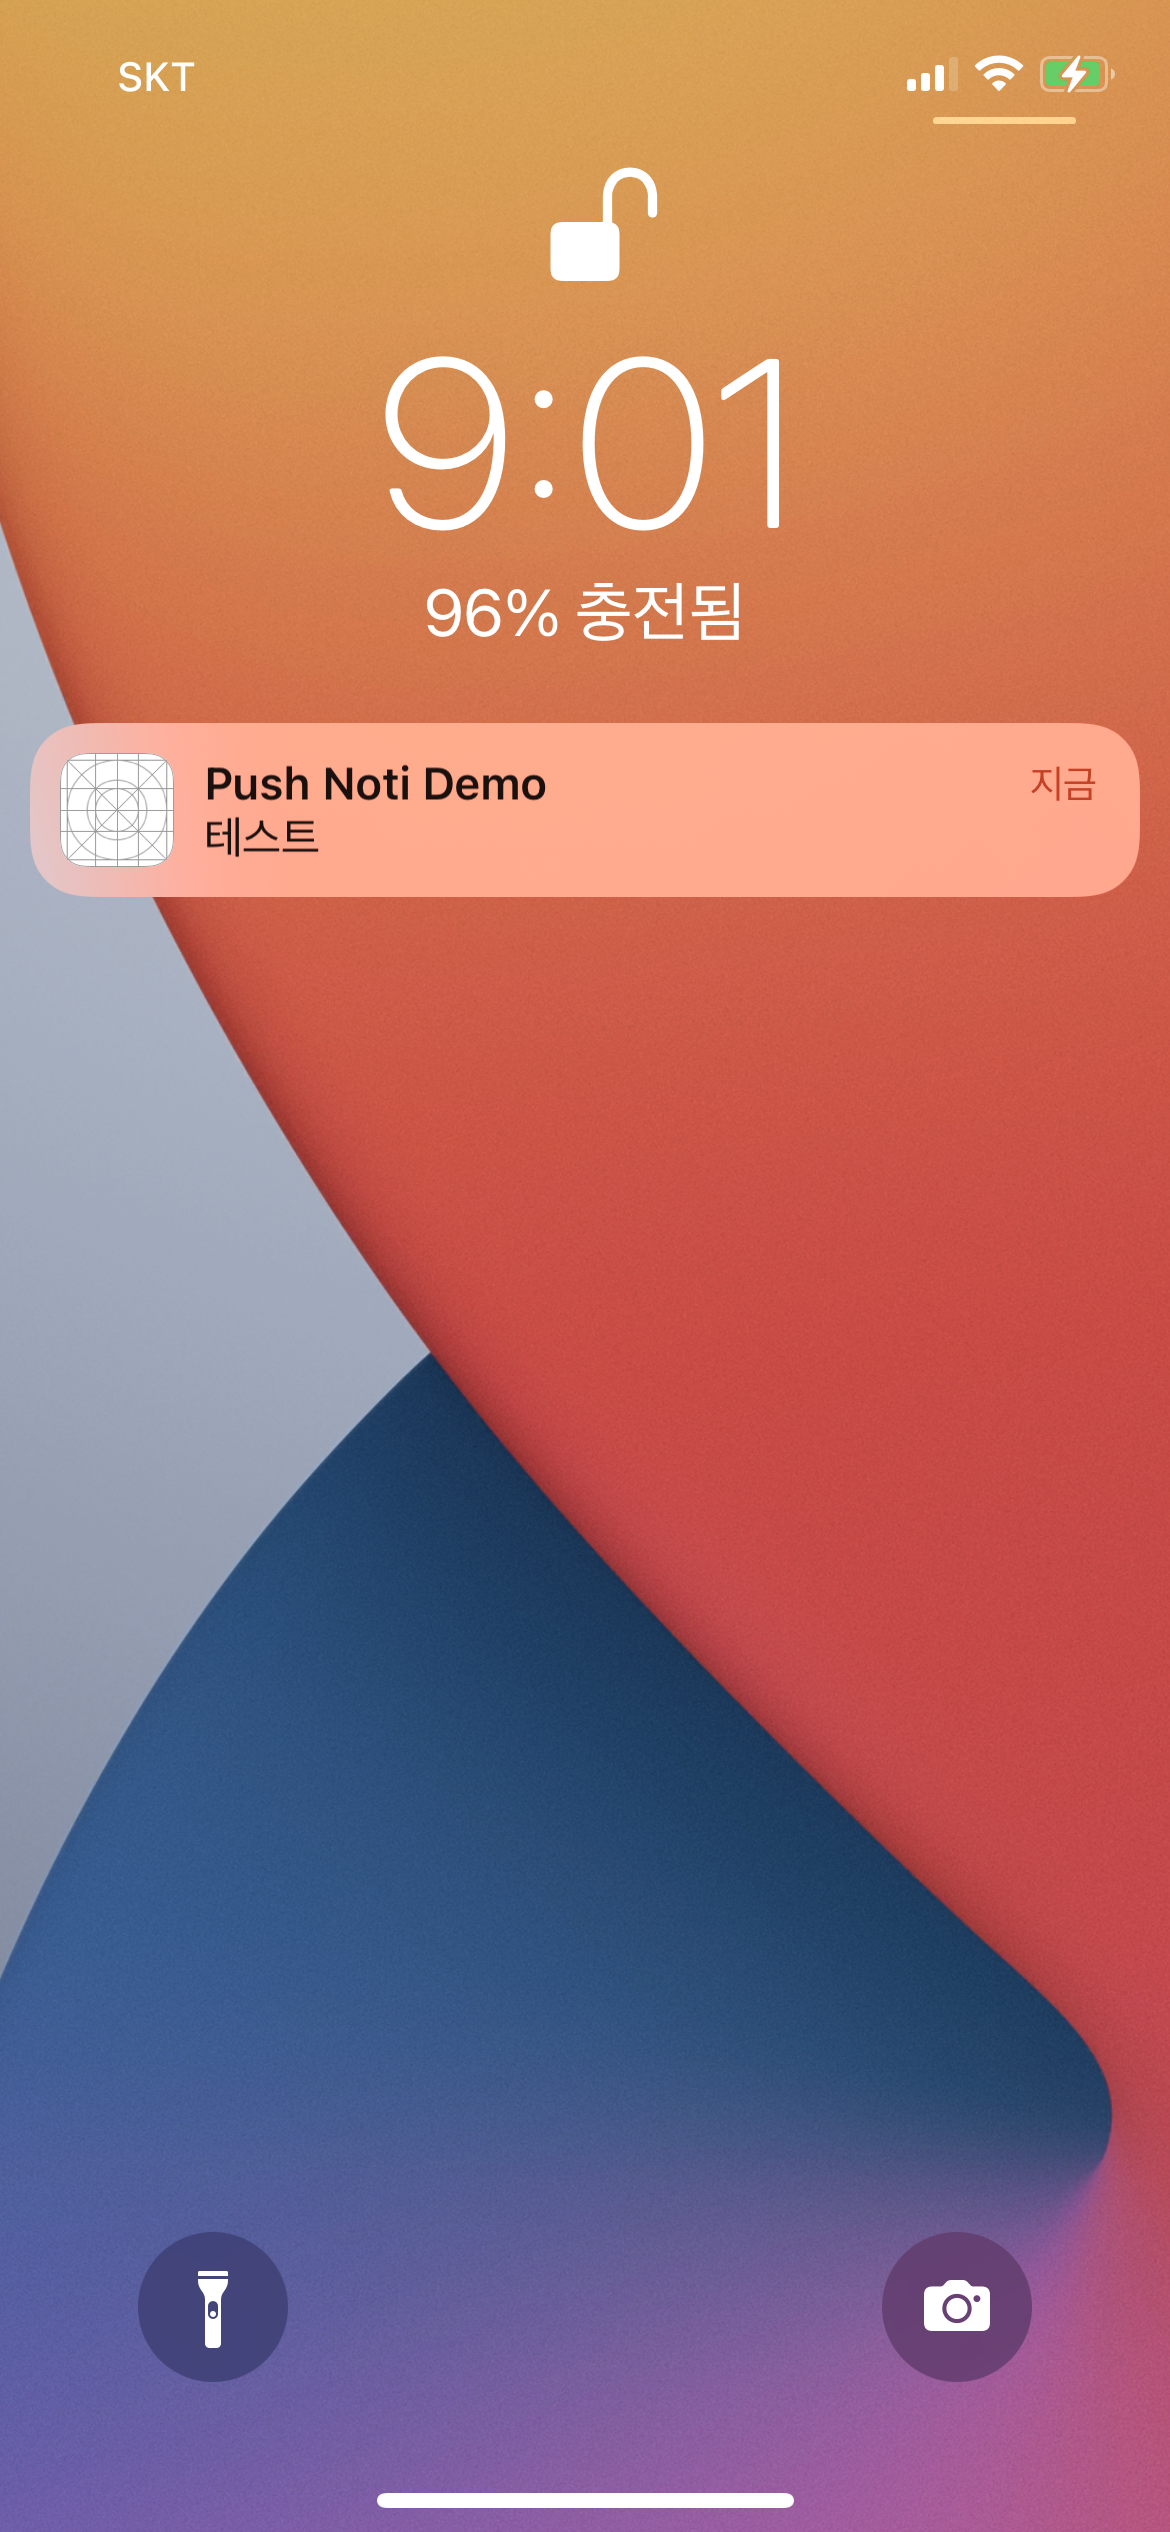
7. 결과 확인
푸쉬알림 테스트 성공!
'사이드 프로젝트' 카테고리의 다른 글
| [위로 개발일지 3편] Apps Script를 이용한 Firestore 데이터 관리 (0) | 2022.03.12 |
|---|---|
| [위로 개발일지 2편] FCM 메시징 요청을 위한 node.js 서버 구현하기 (0) | 2022.03.12 |

